Let me just say that if you decide to build the standard
version of the FS18 without the rounded chine option you'll save yourself several hours of tedious work. The rest of the hull
stitches together without very little effort and can be done in less than an hour without hurrying.
I did have to use screws on the bottom panels where
they intersected the Frames C & B. The panels didn't want to readily conform to the gentle curves of the frame edges.
Placing 2 screw towards the edges of the bottom panels on Frame C & B coaxed the plywood into the necessary curves without
creating a noticable depression or flat spot. The bottom panels ended up sitting off of the frame edges of B & C about
1/4" to 3/8" at the keel which is acceptable enough and the bends flow naturally at that postion. Tightening the screws any
more created depressions in the bottom panels. Everywhere else, the panels intersected the frames perfectly. I also used 2
screws per panel where they overlapped the transom just to hold them in postion.
The Round Chine:
Trying to align and secure the 1 inch strips that
create the rounded chine at the bow is very time consuming. I spent a couple of hours testing out different assembly techniques.
Basically, I ended up stitching them all together.
Unfortunately, I didn't stop and take any pictures
of my progress. Once I started on "the system" I kept moving because it was fairly tedious. I figured if I stopped, I wouldn't
come back to it for a while.
I'll attempt to describe how I performed this task...
Starting where the 1st cut for the strips begin
(near Frame C) and using small tie-wraps I slowly worked my way forward towards the bow on each side of the hull. I used screws
on the top strips where they intersected the frames. The screw were necessary to coax the strip into bending vertically so
it would follow the radius of the frame edge. The top three strips had the steepest part of the radius to conform against.
The bottom strips seemed to fall on a gentler section of the radius and really didn't require screws to get them to bend sufficiently.
I progressed along the chine towards the bow by
drilling small holes along the strip edges, tie wrapping them against one another, and then spacing the next placment about
4" - 6" forward. I stair stepped the vertical spacing about 1/2" to 1". Starting on the top strip, I drilled two holes on
each edge, moved over 1/2" to 1" and dropped down to the next set of strip edges and drilled again. After each vertically
stepped series I inserted tie wraps and tighted them. I assisted the strip alignment by pushing the strips outward slightly
while at the same time synching down the tie wrap. This seemed to aid in getting the strips conform to the radius.
Here's a slide show of the final results (Click on the picture below to start the show)
After everything was stitched I removed the screws
holding the chine strips in place. The strips were secure without the screws.
Stitching Update 3/5/07 - I've had a couple
of days to review the process I used to stitch together the chine strips. Two things in particular bothered me over that time.
One - the number of stitches I used to get the strips to behave. Two- there was a "stair step" effect on several of the strips
on both sides of the hull.
"Stair step" maybe kind of vague so let me see if
I can describe what happened - Basically, there was about an 1/8" of the strip edge, usually the top edge, that was raised
out from the neighboring strip.
While I could have left this feature alone and simply
ground, sanded, & further faired it even, I didn't like that idea. If you've ever built a boat before, the majority of
the work seems to consist of fairing by filing & sanding. I didn't like the prospect of the amount that was going to be
needed on this rounded chine section, so I pondered what I could do that might solve the problem and hopefully reduce the
amount of stitching for others buildiing this option. Also, I had the fear of sanding away the wood flour and epoxy filler
I would be using to hold all of this together once the stitches were removed.
Here's what I came up with. (Please note that if
you think there is a better way please let me know & I'll post it for others to try.)
First, I would ask the designer, Jacques, if he could
provide an intermediate mold between Molds A & B as a temporary "throw away" mold. I think this would really assist in
getting the stips to make the necessary bends and save time positioning the strips on the round chine option. It would provide
another edge to temporarily screw the stips against.
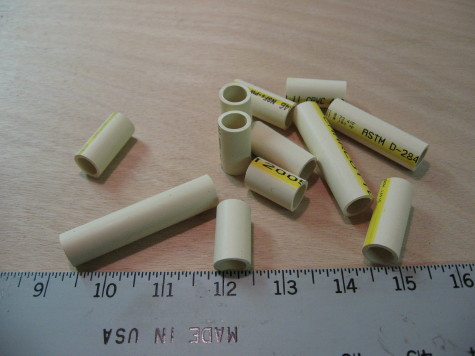
Failing that, I would use round dowels or short sections
of 1/2" pvc pipe behind the stitching. It would probably be enough to use one of the dowels on every other stitch along a
particular strip seam. Here's a picture of the pvc pipe sections I used. I got the pipe at Home Depot in the plumbing section.
The outside diameter is actually 5/8". One section of 8' pipe cost about $3.75, so it was much cheaper than comparable wood
dowels. This wood dowel technique, I believe, is described in Devlin's book.
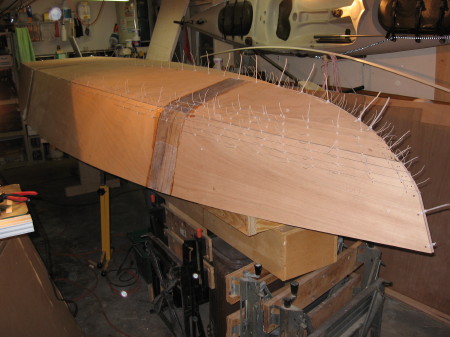
The above picture shows the inside of the hull, near
the bow tip, where the chine strips start to merge.
Now that you've said to yourself "you've gotta be
shitting me?!", let me explain how it ended up like this and how you could probably avoid some of the excess stitching & dowels...
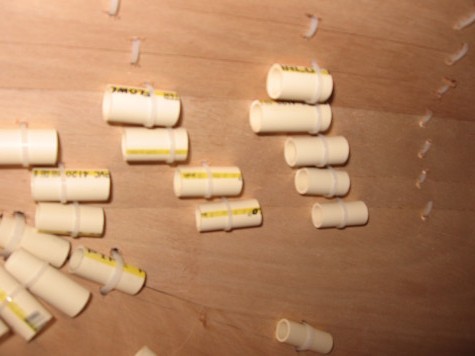
When I began with this method, I didn't use the dowels,
and I just used tie wraps to get the strips to behave. I've redone some of the sections and if I had used the dowels to begin
with, I probably could have reduced the amount of stitching by at least one third. The other huge benefit of the dowels is
that they help not only align the strip, but also evened out the adjacent edges and greatly reduce or eliminated the "stair
stepping" I experienced by just using the tie wraps alone.
So there you have it. I'll probably rewrite this
section when I have more time and see the final results after fairing the chine & bow.
_________________________________________________________________________
As a side note... it's been exactly 4 weeks since
I started this project. I'm not sure where I expected to be at this time frame. I probably would have predicted that I would
be farther along in the process. According to my time estimations, I've logged about 67 hours of build time so far. That's
quite a bit, but it's all been a solo project up to this point and doing things by yourself certainly takes more time. (Let
me clarify that the hours I'm using here: This is the time I've spent in the garage. This includes prep, actual hands on,
prepping for the next step, and standing around scratching my head pondering how to go about something, or "Where the hell
did I leave my pencil or tape measure". When your working alone, there's no one to point out where you last left something!
So, lookng back and taking stock of what it took
to get to this point, I predict that on April 3rd, I'll be prepping the inside of the hull for laminating the fiberglass on
the sides and bottom. What needs to be done to get there is: Outside seams tabbed, stitches pulled, seams filled, seams rounded,
keel, chine & transom taped, sides laminated w/ 6 oz. biax, bottom laminated with 12 oz. biax, hull faired, rubrail base
attached, outside hull primed and fully faired, and finally the hull flipped.
After writing all that out I'll be very lucky
to have the hull faired in 4 weeks! (Edit - 5/12/07 I was dreaming Big Time!!!)