The rubrails on this design are structural components and add quite a bit of stiffness to the hull
panels. The designer recommends building the rubrails before the boat is flipped over. It will help hold the desired sheer
curves in place so they are correct when the inside get glassed. The finished rubrails are about 3/4" thick and about 1-1/2"
wide. Trying to get a piece of 3/4' thick wood to bend around a curve is an exercise in futility, so the rubrails are built
up using 1/4" thick strips. The amount of scrap, 1/4" marine plywood left over from the the bill of materials is pretty minimal.
I had enough leftover plywood to make about half the strips I neededs for the rubrail. The remainder of the wood was made
from clear cypress and ripped to size on a tablesaw. Here's a picture of the strips being prepared for the epoxy/wood flour
glue that bonds them to the hull.
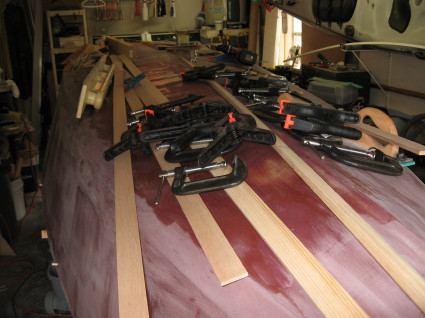
As you can see from the picture, I also have numerous clamps ready to hold the strips in place
while the glue cured. Unfortunately I didn't get any shots of the rubrail as I built it up over 3 days. I will however briefly
describe the process which is fairly straight forward.
I started the rubrail process by clamping the wood strips to the hull for a dry fit. I picked up
a tip from the Bateau builder forums about using 1/4" wood dowels to help align the strips while they're positioned. I decided
to give it a try and drilled about 3 holes (& sometimes more) per strip section as alignment guides. The dowels are hardwood
and are found in any of the big home improvement stores. This same tip could be used when glueing the stringer sections together
& I wish now that I would have used the dowel technique when bonding them as well.
Once the dry fit for the 1st layer on each side of the hull was done, I precoated the strips on
one side with unthickened epoxy and waited about a 1/2 hour for it to tack up. I then prepared a batch of epoxy thickened
with wood flour and silica to a peanut butter consistency. I lathered up both the hull surface and the strip surface with
the glue and used a notched spreader to even out the glue thickeness (West Systems makes plastic spreaders with different
notch depths on each edge. You can usually find them and a West Marine store or online). I positioned the strips on the hull
using the wood dowels as guides and then started clamping the strip using relatively light pressure. You really don't want
to squeeze out a lot of the glue. One of the great properties of epoxy is the fact that it can be used to fill voids, and
a thick glue line is actually preferred over just a thin layer. So I applied just enough pressure to hold the strip in place
and force it to conform to the curve of the side panel. I probably had clamps placed every 12" along the length of the rubrail.
This is where the dowel tip really shined. Normally the thick glue would provide enough lubrication for the strips to slide
all over the place, especially on the compound curvature around the bow area. The dowels keep the strip in position while
the clamps are tightened without moving the strip around. This was a major pain when I glued the stringer sections together.
After the 1st layer cured, I used a thin bladed japanese pull saw to cut the dowels flush and to trim the excess strip material
overhanging at the bow and transom.
This process gets repeated for the next two layers as well: Dry fit, postion & drill for alignment
dowels, precoat, glue the strip, place clamps, cure, & trim. After everything was glued up, I created a fillet between
the rubrail and the hull sides using the same technique I used earlier for the skeg fillet.